Ubuntu - Blazing fast WordPress with Nginx php7 redis


You have buy a VPS to speed up WordPress, but you are using a control panel and it's not faster than before ? In this tutorial, you will learn how to setup a Blazing fast WordPress with Nginx php7 and redis cache.
This will require to use the the command linux via SSH. Yes I know, it's less user friendly than a control panel. But it will not require any resources after the install and we have an amazing tools to help us : EasyEngine
So, first we will talk about what we are going to install and why it will make WordPress faster.
Nginx : To pronounce "Engine X", it's the web server created in 2002, created to handle high traffic with a low memory footprint. And this is the reason which explain why Nginx is so popular at the moment. It can also be used as a reverse proxy or as a load-balancer, which means if you have few small VPS, you will be able to create a stable and reliable platform to host your website.
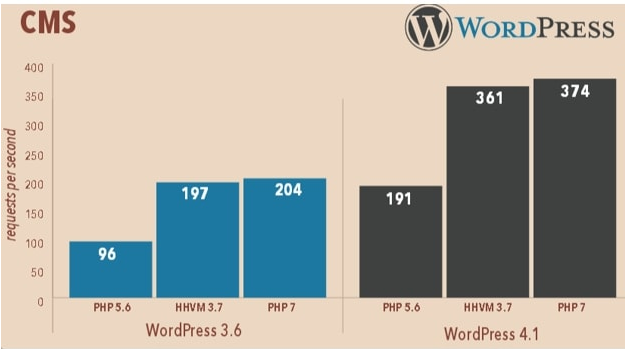
php7 : I will not explain what is the php but more about the difference between the 5.6 and the 7. It's the performance and there is nothing better than a small graphic to compare them. And WordPress is fully compatible with the latest version of php.
MariaDB : If you haven't already used it, MariaDB is a fork of Mysql from his creator, and it's an open-source solution which is currently faster than Mysql with a lower memory and processor footprint. So no need to hesitate, if you are still using msql, even in 5.7, it's time to move !
Redis : What is Redis ? It's a remote dictionary server, which will manage your database and store the values in the memory. It's a "NoSQL" solution as Redis can be used as a database by writing data on your hard drive SSD. For WordPress there is no faster solution as it will eliminate the queries to your database, and even if you are using Mariadb, it will be faster and using less resources.
But you are maybe thinking it will be very hard to configure all that stuff properly. No, you will be able to do it in less than 10 minutes ! Because we are going to use EasyEngine, the most powerful tools to create an optimized WordPress website.
It's a command line tool to create install and configure a complete web server with Nginx, PHP, MariaDB and Postfix in a single command. It also provide you the ability to manage properly your virtualhosts with Nginx and make it easy with simple command to use.
So to start you need a VPS with Ubuntu 14.04. EasyEngine is also compatible with debian 7/8 and Ubuntu 16.04. But as EE has been build at first for ubuntu, it's the most stable solution.
At first we need to install EasyEngine.
wget -qO ee rt.cx/ee && sudo bash eeDone, EasyEngine is now ready to install what we need. So we are looking for WordPress with nginx, php7, redis and as it will not be harder, a SSL with let's encrypt. But you have the choice with EE :
A simple website for html :
ee site create example.com --htmlA website with php :
ee site create example.com --phpA website with mysql :
ee site create example.com --mysqlA website with SSL by let's encrypt
ee site create example.com --letsencryptAnd for WordPress ? You just have to choose :
ee site create example.com --wp # install wordpress without any page caching

ee site create example.com --w3tc # install wordpress with w3-total-cache plugin

ee site create example.com --wpsc # install wordpress with whisp-super-cache plugin

ee site create example.com --wpfc # install wordpress + nginx fastcgi_cache

ee site create example.com --wpredis # install wordpress + nginx redis_cache
So for my example, I will use :
ee site create yourwebsite.com --wpredis --letsencrypt --php7You will have to enter Yes to the EE questions, and yes your wordpress with redis php7 and SSL is already installed and configured. You also have two plugins in WordPress :
- Nginx Helper to clear the cache
- Redis Cache : To connect WordPress with Redis and to clear the cache
But you will maybe ask how you can connect to the database, what is the user of mysql and wordpress ? You can use a custom user during the install process by using
--user=admin and -pass=password to set WordPress login details.
But you can also look at the install log to find them as EE display it in the console :
nano /var/log/ee/install.logTo see all the commands available with the websites :
ee siteIf you want to edit some default configuration (database, user etc) :
nano /etc/ee/ee.confBy default EasyEngine create a backend access with all tools you can install with it (phpmyadmin, cache, php infos) at the address : http://yourserverIP:22222
To secure it properly just use :
ee secure --authIt will ask you for a user and a password. You can edit it at anytime.
To edit the default port :
ee secure --portAnd to get the mysql user of a website :
ee site info yoursite.comSo I recommend you to change the port of admin tools, and to install what you need in the following :
Adminer (phpmyadmin alternative )
ee stack install --adminerphpMyAdmin :
ee stack install --phpmyadminphpAdminRedis (to manage data in cache) :
ee stack install --phpredisadminAll the Admin tools (Adminer, phpMyAdmin, phpMemcachedAdmin, FastCGI cleanup script, OPcache, Webgrind, Anemometer) :
ee stack install --adminYou have to agree this tool is really awesome. And if you look to your memory usage using htop, you will see the difference with a control panel. Your website will be faster and you have the ability to edit your configuration or to add module when you want.
So to conclude this tutorial here the links you will need to understand perfectly EasyEngine and to use it for all your setup :
Leave a comment if you have any question !