Good bye WordPress - Welcome Ghost !


I'm using WordPress for few years now, but that's always the same problem, WordPress require plugins to have some functionalities and plugins make WordPress running slower.
Even with an advanced caching system like redis, that's always a lot of work to make wordpress running fast and safe.
So I have done some tests with Ghost using Docker, and it's really the perfect blog solution for me, because it already include all the features needed to write an article.
No need to look for a plugin to improve SEO or to install a caching system.
You can write you articles in markdown, work with slack and use it as a team, and the theme system is really clean and lightweight.
But I can't post this article without making a tutorial about Ghost.
1) Install NodeJs v4 LTS
wget https://deb.nodesource.com/setup_4.x
chmod +x setup_4.x
./setup_4.x
apt-get install nodejs -y
2) Install Ghost
mkdir /var/www/ghost
cd /var/www/ghost
curl -L https://ghost.org/zip/ghost-latest.zip -o ghost.zip
unzip ghost.zip
npm install --production
3) Starting Ghost
npm start --production
Then you can access to your blog using http://localhost:2368/ghost/signup
All the configuration can be found in the file config.js.
But as you can see, we have to use the port 2368 to access to Ghost. To fix that, the easiest is to use Nginx as reverse proxy. Let's use easyengine !
## install easyengine
wget -qO ee rt.cx/ee && bash ee

## create a proxy with your domain
ee site create anystack.xyz --proxy=127.0.0.1:2368
Then you will be able to use your domain to access to ghost. Don't forget to change your blog url in config.js. And if you want to run Ghost forever, so use forever ...
npm install forever -g
## start ghost
NODE_ENV=production forever start index.js

## stop ghost
forever stop index.js
Last tips ? How to use Ghost with Nginx as reverse proxy with Cloudflare SSL.
Go into you Cloudflare account and in the Crypto tabs, create your origin certificate.
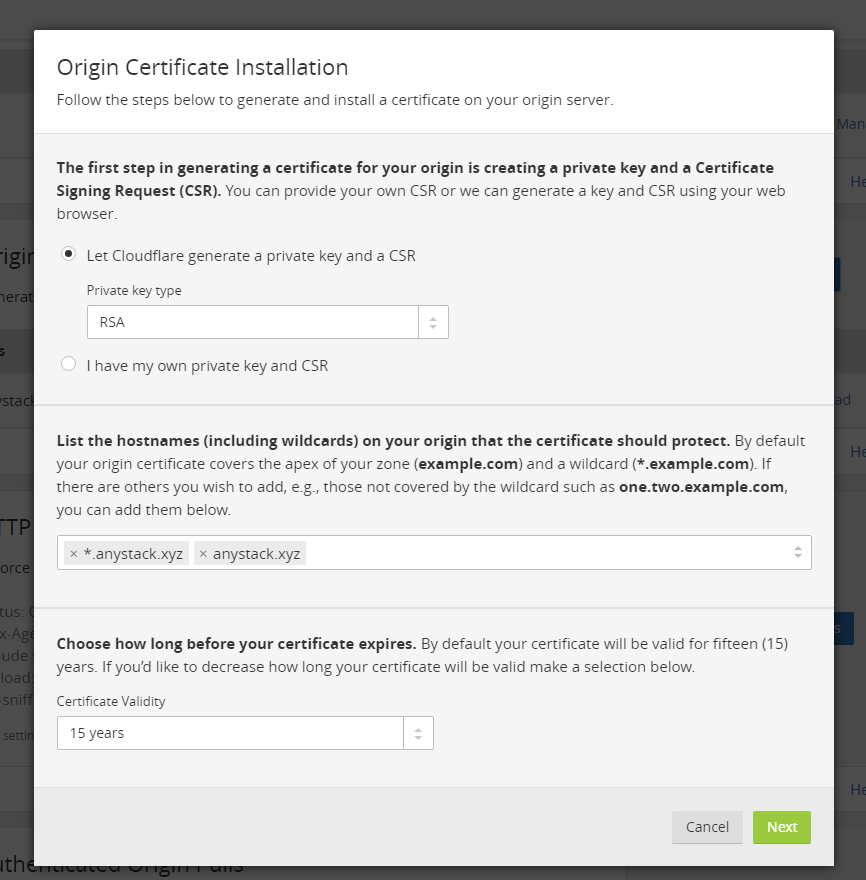
Then create a first file yourdomain-pvkey.pem with the private key generated by Cloudflare. And another file yourdomain-crt.pem with the origin certificate from cloudflare but also the Cloudflare root certificate you can find here
Then your nginx conf for you domain should look like
server {

    server_name anystack.xyz;
    listen 443 ssl http2;
    ssl on;
    ssl_certificate     /etc/nginx/ssl/anystack-crt.pem;
    ssl_certificate_key     /etc/nginx/ssl/anystack-key.pem;
    access_log /var/log/nginx/dev.anystack.xyz.access.log rt_cache;
    error_log /var/log/nginx/dev.anystack.xyz.error.log;

    location / {
        proxy_set_header X-Forwarded-For $proxy_add_x_forwarded_for;
        proxy_set_header Host $http_host;
        proxy_set_header X-Forwarded-Proto $scheme;
        proxy_pass http://127.0.0.1:2368/;
        }

}
And if you want to add a redirect from http to a https, create a file yourdomain.com-ssl.conf in /etc/nginx/conf.d with
	server {
	listen 80;
	server_name anystack.xyz;
	return 301 https://anystack.xyz$request_uri;
}